Cherries in the Snow Dessert Recipe – A Creamy, Dreamy Classic
Introduction to Cherries in the Snow
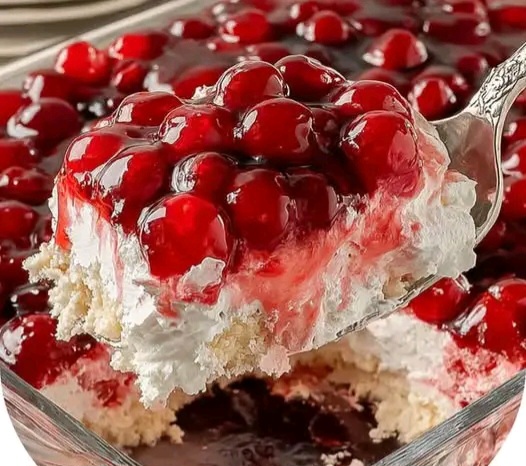
There are some desserts that feel like pure nostalgia, comfort, and celebration all at once — and Cherries in the Snow is exactly that kind of dessert. Light, fluffy, creamy, fruity, and impossibly satisfying, this classic treat has been passed around family gatherings, potlucks, and holiday tables for generations. What makes Cherries in the Snow so magical is the beautiful balance of airy angel food cake, velvety cream filling, and bright, glossy cherry topping. Every bite feels like a soft cloud with a burst of fruitiness, making it perfect for nearly any season but especially delightful during holidays when cherry desserts take center stage.
Even if you’ve never made Cherries in the Snow before, you’ll quickly fall in love with how simple, quick, and forgiving it is. There’s no baking required if you use a store-bought angel food cake, and the assembly process is beginner-friendly yet impressive enough to serve to guests. This dessert not only tastes dreamy but also looks beautiful, making it a standout addition to your recipe collection.
Why This Cherries in the Snow Recipe Works
There are countless variations of layered desserts, but Cherries in the Snow remains a favorite for many reasons. First, it relies on the perfect combination of texture: soft cake, creamy filling, and thick cherry topping. The angel food cake adds lightness and structure without heaviness. The cream cheese mixture brings richness without being overly sweet. And the cherry filling provides color, brightness, and fruity contrast.
Another reason this Cherries in the Snow dessert works so well is because it improves as it chills. The layers settle, the flavors blend, and the texture becomes even more luxurious after several hours in the refrigerator. It’s the ultimate make-ahead dessert — convenient for busy schedules, parties, or holidays when you want dessert done early.
The recipe also works beautifully because it’s flexible. You can make Cherries in the Snow in a trifle bowl, a 9×13 pan, individual serving cups, mason jars, or small dessert glasses. You can customize it with different cake varieties, different fruit toppings, or add-ins like nuts, coconut, or chocolate. But even with no changes at all, Cherries in the Snow holds up as a timeless classic that never disappoints.
What You’ll Need for This Cherries in the Snow Recipe
One of the perks of making Cherries in the Snow is that you only need a handful of simple ingredients—most of which are pantry staples or easy to find at any grocery store. Here’s what goes into creating this luscious dessert:
Cream Layer Ingredients
12 oz cream cheese (softened) – This creates the silky, rich foundation of the creamy layer. Softening it ensures a smooth texture.
¾ cup powdered sugar – Sweetens the cream mixture without making it grainy.
⅓ cup whole milk – Helps loosen the mixture and gives it a beautiful, pourable creaminess.
½ tsp vanilla extract – Adds warmth and depth to the flavor.
8 oz whipped topping (like Cool Whip) – Makes the creamy filling light, fluffy, and cloud-like.
Cake Layer
1 angel food cake, torn into bite-size pieces – Provides the classic airy, spongy texture unique to Cherries in the Snow.
Cherry Layer
2 cans (21 oz each) cherry pie filling – The dazzling top layer that brings color, flavor, and sweetness.
With these few ingredients, you can build the beautiful layers that make Cherries in the Snow unforgettable.
How to Make Cherries in the Snow
Making Cherries in the Snow is wonderfully simple. The steps below guide you through creating perfect layers that stay light, fluffy, and stable.
1. Make the Creamy Filling
Start by beating the softened cream cheese until smooth and lump-free. This is important — any lumps will show up once you add the other ingredients. Next, add powdered sugar, whole milk, and vanilla, then mix until the filling becomes creamy and glossy. Finish by gently folding in the whipped topping. This step requires a light hand to maintain fluffiness — folding prevents the mixture from deflating.
2. Assemble the Layers
To assemble your Cherries in the Snow dessert, begin with half of the torn angel food cake in the bottom of your trifle dish or 9×13 pan. Then spread half of the cream layer on top. Spoon one full can of cherry pie filling over the cream.
3. Repeat the Layers
Add the remaining angel food cake, followed by the rest of the cream mixture, and finish with the second can of cherry pie filling. Smooth the top for a neat, polished look.
4. Chill the Dessert
Refrigerate your Cherries in the Snow for at least 4 hours, although overnight is best. Chilling helps the layers firm up and meld together, creating the signature texture that makes this dessert so irresistible.
5. Serve and Enjoy
When ready to serve, spoon into bowls, cups, or glasses. For an added touch of elegance, garnish with fresh cherries, shaved white chocolate, or even a dusting of powdered sugar to mimic freshly fallen “snow.”
Tips + Tricks for Cherries in the Snow Success
To get the best possible results with your Cherries in the Snow recipe, these simple tips will help ensure every batch comes out smooth, structured, and flavorful:
1. Use softened cream cheese
Cold cream cheese creates lumps. Make sure it’s fully softened before mixing.
2. Fold, don’t stir
Folding keeps the cream layer airy and prevents the whipped topping from deflating.
3. Tear the cake instead of cutting
Torn angel food cake grips the cream better and creates a more natural textured look.
4. Chill for the full amount of time
If you rush the chilling step, the layers won’t set correctly. Overnight chilling is ideal.
5. Choose the right dish
A glass trifle bowl beautifully showcases the layers of Cherries in the Snow, but a 9×13 pan works perfectly too.
6. Add garnishes just before serving
Fresh cherries or chocolate shavings add a professional finish but should be added at the last minute to stay fresh.
7. Swap toppings if needed
If you want to experiment, strawberry, raspberry, or blueberry filling can be used — but cherry keeps the classic Cherries in the Snow flavor alive.
How to Serve Cherries in the Snow
Presentation can elevate this dessert even more. Here’s how to serve Cherries in the Snow in ways that make it feel special:
Spoon into glass dessert cups to show off the layers.
Serve in mason jars for a rustic, charming look.
Portion into parfait glasses for elegant holiday entertaining.
Scoop in large squares from a 9×13 pan for family-style gatherings.
The beauty of Cherries in the Snow is that it’s gorgeous no matter how you serve it.
Serving Suggestions for Cherries in the Snow
Pairing Cherries in the Snow with the right side options or additions can make the experience even more delightful. Here are a few ideas:
Add a swirl of whipped cream on top.
Sprinkle crushed graham crackers or vanilla wafers for a bit of crunch.
Drizzle white chocolate or cream cheese glaze.
Serve alongside hot coffee, tea, or cocoa.
Add shaved coconut for a snowy winter aesthetic.
Time Required for Cherries in the Snow
Another reason Cherries in the Snow is so popular is because it’s incredibly quick to prepare:
Prep time: 15 minutes
Assembly time: 10 minutes
Chill time: 4 hours minimum (overnight preferred)
Total time: About 4 hours 30 minutes
For a no-bake dessert that looks this impressive, the time required is incredibly convenient.
Final Thoughts on Cherries in the Snow
Whether you’re preparing a festive holiday spread, contributing to a potluck, or simply craving something sweet and creamy without the hassle of baking, Cherries in the Snow is the perfect choice. This recipe is simple yet stunning, nostalgic yet timeless, and endlessly customizable while staying true to its classic charm. With the perfect balance of soft cake, velvety cream, and vibrant cherry topping, Cherries in the Snow is a dessert that always brings smiles — and usually requests for seconds.
If you’ve been searching for a dessert that’s guaranteed to impress with minimal effort, Cherries in the Snow is the one you’ll return to again and again.