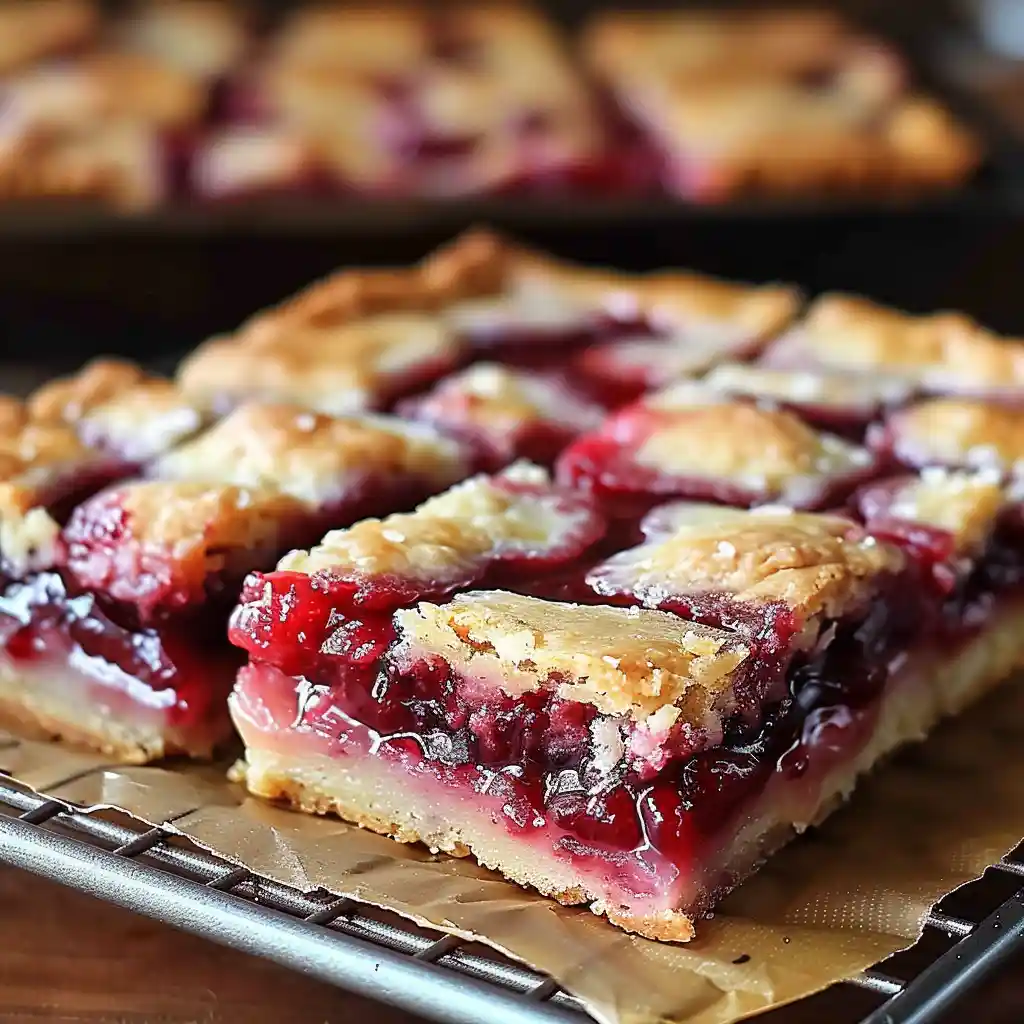
Cherry Pie Bars
Introduction
There’s something irresistibly nostalgic about Cherry Pie Bars — the perfect blend of buttery crust, sweet-tart cherries, and a crumbly golden topping that practically melts in your mouth. They taste like a slice of old-fashioned cherry pie but are so much easier to make and even easier to share. Whether you’re baking for a summer picnic, a holiday dessert table, or just a cozy weekend treat, Cherry Pie Bars deliver comfort and joy in every bite.
These bars embody everything we love about home baking — the aroma of warm fruit bubbling under a golden crumble, the satisfaction of slicing into neat, glossy squares, and the delightful combination of crisp edges and gooey cherry centers. Unlike a traditional pie that requires rolling dough and perfecting crust edges, this recipe turns all that effort into a simple, foolproof bar form that even beginner bakers can master.
Once you make Cherry Pie Bars, you’ll wonder why you ever spent hours fussing with pie dough. They’re quick, portable, and universally adored — a dessert that bridges nostalgia and convenience beautifully.
Why This Recipe Works
Every element in these Cherry Pie Bars has been designed for maximum flavor, texture, and ease. Here’s why this recipe works so beautifully every single time:
The perfect crust-to-filling ratio: The buttery base provides structure and sweetness without overpowering the cherry filling. It’s sturdy enough to hold the juicy layer but tender enough to melt in your mouth.
The dual-purpose dough: The recipe uses one base dough — two-thirds pressed into the pan as the crust, while the rest becomes part of the crumble topping. This not only saves time but ensures a cohesive flavor profile throughout.
The simplicity of canned filling (or fresh fruit): Using canned cherry pie filling makes the recipe incredibly convenient, while fresh or frozen cherries give you a more rustic, tangy flavor. Both options bake beautifully.
A balance of textures: Between the soft cherry layer and the crisp, buttery crumble, every bite offers a satisfying contrast.
Versatility: Don’t feel limited to cherries! The same method works for blueberries, peaches, apples, or even raspberries — once you master the Cherry Pie Bars, the possibilities are endless.
Effortless presentation: They look bakery-perfect without special tools. Just bake, cool, slice, and serve — no pie dish required.
This combination of simple ingredients and foolproof steps ensures that your Cherry Pie Bars come out golden, flavorful, and crowd-pleasing every time.
What You’ll Need For This Recipe
To make your own batch of Cherry Pie Bars, you’ll need basic pantry staples and one key ingredient — cherries!
For the Crust
2 1/2 cups all-purpose flour: The foundation of your crust and crumble.
1 cup granulated sugar: Adds sweetness and helps the crust brown beautifully.
1 teaspoon baking powder: Gives the base a subtle lift so it’s not too dense.
1/2 teaspoon salt: Balances the sweetness and enhances flavor.
1 cup unsalted butter, cold and cubed: The secret to flaky, tender texture.
1 large egg: Helps bind the dough and gives it richness.
For the Cherry Filling
1 (21 oz) can cherry pie filling: Easy and convenient, full of flavor.
OR about 2 cups fresh or frozen cherries: For a homemade touch.
1 tablespoon cornstarch (optional): Helps thicken the filling if you’re using fresh or frozen fruit.
For the Crumble Topping
1/2 cup all-purpose flour
1/2 cup granulated sugar
1/2 teaspoon cinnamon: Adds warmth and depth.
1/4 cup unsalted butter, melted: Binds the topping into golden, crunchy crumbles.
With these simple ingredients, you can whip up bakery-quality Cherry Pie Bars in under an hour.
How To Make Cherry Pie Bars
Let’s walk through each step of making Cherry Pie Bars from scratch — easy enough for beginners, impressive enough for guests.
Step 1: Preheat Your Oven
Preheat your oven to 350°F (175°C). Line a 9×13-inch baking pan with parchment paper or lightly grease it. This ensures your bars lift out easily after baking.
Step 2: Make the Crust
In a large mixing bowl, combine flour, sugar, baking powder, and salt.
Add the cold, cubed butter and use a pastry cutter (or your fingertips) to cut it in until the mixture looks like coarse crumbs. The small butter pieces will create that signature flaky texture.
Beat the egg lightly, then mix it into the crumbly dough. The dough should begin to clump together — thick and slightly sticky but not wet.
Press about two-thirds of this dough evenly into the bottom of your prepared pan to form a smooth crust. This will bake into a buttery, melt-in-your-mouth base.
Step 3: Prepare the Cherry Filling
If you’re using canned cherry pie filling, it’s ready to go — just spread it evenly over the crust.
If you’re using fresh or frozen cherries, place them in a small saucepan with the cornstarch and cook over medium heat until the mixture thickens and the cherries soften (about 5–7 minutes). Then spread the filling evenly across the crust.
The vibrant red cherry layer should cover every corner of the pan.
Step 4: Make the Crumble Topping
In another bowl, combine flour, sugar, and cinnamon. Add the melted butter and stir until you get a crumbly texture — sandy but clumping slightly when pressed.
Sprinkle this mixture evenly over the cherry layer. Don’t worry about perfect coverage; those little cherry peeks make the bars look even more delicious.
Step 5: Bake to Perfection
Place the pan in your preheated oven and bake for 40–45 minutes, or until the top turns golden brown and the cherry filling is bubbling slightly around the edges.
Your kitchen will fill with the cozy aroma of cherries and butter — a sure sign your Cherry Pie Bars are almost ready.
Step 6: Cool and Slice
Allow the bars to cool completely in the pan on a wire rack. This cooling step helps them set, so they’re easier to cut into clean squares.
Once cool, lift the bars out using the parchment paper, slice them into neat squares or rectangles, and admire your handiwork.
Congratulations — you’ve just made perfect Cherry Pie Bars!
Tips + Tricks & More For Recipe Success
Baking Cherry Pie Bars is simple, but these pro tips will help you take them from good to irresistible:
Use cold butter. Cold butter ensures your crust stays flaky, not greasy. If the butter softens too much, chill the dough for 10 minutes before pressing it into the pan.
Don’t skip the salt. Even sweet recipes need a little salt to balance the flavors and enhance richness.
Customize the filling. Substitute cherry filling with blueberry, apple, or even raspberry for seasonal twists.
Add a touch of almond extract. Cherries and almond are a match made in heaven — add ¼ teaspoon to the crust or filling for a subtle nutty aroma.
Make it gluten-free. Use a 1:1 gluten-free flour blend and ensure your pie filling is gluten-free as well.
Cut when cool. If you cut while warm, the filling will ooze out. Wait at least 30 minutes, or chill briefly for clean, photo-worthy slices.
Double it for crowds. This recipe scales beautifully — just use a larger sheet pan and adjust the baking time slightly.
Storage tip: Store Cherry Pie Bars in an airtight container at room temperature for 2 days or in the refrigerator for up to 5 days. You can also freeze them (individually wrapped) for up to 2 months.
Add a drizzle: A quick powdered sugar glaze (1/2 cup powdered sugar + 1 tablespoon milk) drizzled over the top adds extra sweetness and bakery-style flair.
Serve warm with ice cream. Vanilla ice cream melting into warm Cherry Pie Bars is pure heaven.
How to Serve Cherry Pie Bars
Cherry Pie Bars are incredibly versatile when it comes to serving. You can enjoy them warm from the oven, at room temperature, or chilled straight from the fridge.
For casual gatherings, slice them into squares and serve on a platter dusted with powdered sugar. For a fancier presentation, top each bar with a small dollop of whipped cream and a fresh cherry on top.
They’re a great make-ahead dessert — in fact, the flavor deepens overnight as the cherry filling infuses into the crust. If you’re serving them the next day, warm them briefly in the microwave (10–15 seconds) for that just-baked taste.
Serving Suggestions
These Cherry Pie Bars are a perfect addition to almost any occasion. Try serving them:
At summer picnics with lemonade or iced tea.
During holidays alongside other dessert bars and cookies.
At brunch with coffee or mimosas for a sweet contrast.
As a dessert platter paired with chocolate-dipped strawberries and mini cheesecakes.
With a scoop of vanilla or almond ice cream, letting it slowly melt into the cherry layer.
Their bright color and rich flavor make Cherry Pie Bars an instant crowd-pleaser wherever you take them.
Time Breakdown
Here’s how long it takes to make Cherry Pie Bars from start to finish:
Prep Time: 20 minutes
Cook Time: 40–45 minutes
Cooling Time: 30 minutes
Total Time: About 1 hour 30 minutes
That’s less than two hours for a homemade dessert that tastes like it came straight from a bakery window.
Final Thoughts
There’s a reason Cherry Pie Bars have become a modern classic — they strike the perfect balance between simplicity and indulgence. Every bite delivers buttery richness, tart cherry flavor, and a satisfying crunch. They store well, travel beautifully, and look stunning on any dessert table.
Whether you make them for a family gathering, bake sale, or just because you’re craving something sweet and nostalgic, Cherry Pie Bars are guaranteed to impress.
So grab your mixing bowl, pop open that can of cherry pie filling (or pit some fresh cherries if you’re feeling fancy), and treat yourself to the joy of homemade baking. Once you taste these Cherry Pie Bars, they’ll become a staple in your kitchen — and a favorite in everyone’s heart.