Reese’s Peanut Butter Earthquake Cake
Introduction
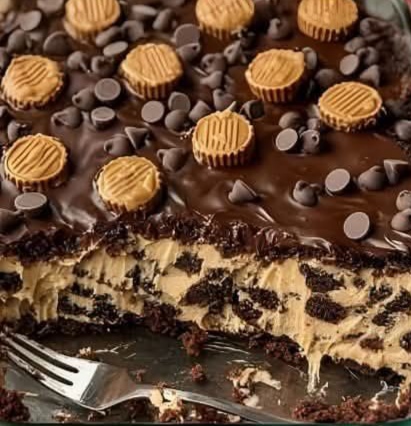
There are desserts that make you smile, and then there’s the Reese’s Peanut Butter Earthquake Cake—a gooey, marbled masterpiece that tastes like pure comfort. Imagine a soft, chocolatey base rippling with creamy peanut butter swirls, studded with melted chocolate chips and chunks of Reese’s cups. Every bite is a mix of textures and flavors—rich, sweet, salty, smooth, and a little bit messy in the best possible way.
The beauty of the Reese’s Peanut Butter Earthquake Cake lies in its imperfections. As it bakes, the thick peanut butter cream cheese mixture sinks into the chocolate batter, creating cracks, bubbles, and swirls that look almost volcanic. It’s the kind of dessert that never looks the same twice—but it always tastes like heaven. Whether you’re baking for a family gathering, a potluck, or just because you’re craving chocolate and peanut butter (again), this cake always delivers.
It’s the kind of recipe that feels nostalgic and new at the same time—simple ingredients, easy steps, and an unforgettable result. Let’s dive into what makes this dessert a true kitchen favorite.
Why This Recipe Works
The Reese’s Peanut Butter Earthquake Cake works because it perfectly balances simplicity and decadence. You start with a humble box of chocolate cake mix—something we all have in the pantry. Then, you transform it into something extraordinary with the help of just a few pantry staples: cream cheese, peanut butter, butter, and powdered sugar.
Here’s why this recipe never fails:
The Layering Technique: By spooning the peanut butter mixture over the cake batter instead of blending it in, you get those signature “earthquake” swirls. The heavier topping sinks into the lighter batter as it bakes, creating natural pockets of creaminess throughout.
The Flavor Balance: Chocolate and peanut butter are a match made in dessert heaven. The slightly salty, nutty peanut butter cuts through the sweetness of the chocolate, creating harmony in every bite.
Texture Perfection: The soft, fudgy base contrasts with the gooey peanut butter filling and the slightly crisp top layer of melted Reese’s and chocolate chips. It’s a full sensory experience—rich, chewy, creamy, and crunchy all at once.
Effortless Elegance: Despite its showstopping look, the Reese’s Peanut Butter Earthquake Cake is unbelievably easy to make. There’s no frosting, layering, or fancy tools—just mix, pour, and bake.
Crowd Appeal: Kids love it for the candy, adults love it for the nostalgia, and everyone loves it for the flavor. It’s a guaranteed conversation starter wherever you take it.
What You’ll Need for Reese’s Peanut Butter Earthquake Cake
You don’t need anything fancy—just a few simple ingredients that come together in pure dessert harmony.
For the Cake Base:
1 box chocolate cake mix (plus eggs, oil, and water as listed on the box)
This forms the foundation of the cake—rich, moist, and perfectly chocolatey.
For the Peanut Butter Swirl Layer:
8 oz cream cheese, softened – adds richness and that gooey, cheesecake-like texture.
1/2 cup melted butter – for moisture and flavor.
1/2 cup peanut butter – creamy or crunchy, depending on your texture preference.
2 cups powdered sugar – for sweetness and to give the filling structure.
For the Toppings:
1 cup Reese’s peanut butter cups, chopped – the star ingredient that ties it all together.
1/2 cup chocolate chips – for that extra melty, chocolaty touch.
Optional: a pinch of sea salt or crushed peanuts for a gourmet finish.
These pantry staples create something far greater than the sum of their parts—once combined, they turn into a melt-in-your-mouth dessert that’s both comforting and irresistible.
How To Make Reese’s Peanut Butter Earthquake Cake
Step 1: Prepare the Base
Start by preheating your oven to 350°F (175°C). Grease a 9×13-inch baking pan—or line it with parchment paper if you want easy cleanup. Prepare the chocolate cake mix according to package directions (usually by mixing the dry mix with eggs, oil, and water).
Pour the batter into your pan, spreading it evenly—but only about halfway full. You’ll need room for the peanut butter layer to work its magic on top.
Step 2: Mix the Peanut Butter Filling
In a separate bowl, beat together the softened cream cheese, melted butter, peanut butter, and powdered sugar. Use a hand mixer or whisk until smooth and creamy. The texture should resemble thick frosting—rich but spreadable.
Step 3: Create the Earthquake
Drop spoonfuls of the peanut butter mixture over the cake batter. Don’t worry about making it perfect—imperfection is part of the charm! Those thick blobs will sink through the batter as it bakes, creating the signature marbled “earthquake” effect.
Step 4: Add the Toppings
Scatter chopped Reese’s peanut butter cups and chocolate chips evenly across the surface. These will melt slightly in the oven, creating pools of chocolate and peanut butter goodness.
Step 5: Bake to Gooey Perfection
Bake for 40–45 minutes, or until the center is mostly set but still soft. You’ll notice cracks, dips, and bubbles forming on top—that’s exactly what you want! This uneven surface is what gives the Reese’s Peanut Butter Earthquake Cake its name.
Step 6: Cool and Serve
Let the cake cool for at least 30 minutes before slicing. It will set up as it cools, becoming easier to cut while staying moist and gooey inside.
Tips + Tricks & More for Recipe Success
Even though the Reese’s Peanut Butter Earthquake Cake is foolproof, a few extra touches can elevate it from great to unforgettable:
Use Room Temperature Ingredients – Cold cream cheese won’t mix smoothly. Let it sit out for about 30 minutes before beating.
Don’t Overbake – The cake should look slightly underdone in the center. As it cools, it firms up while staying soft and fudgy.
Add a Drizzle – For extra peanut butter flair, drizzle melted peanut butter or chocolate syrup right after baking.
Line the Pan – If you want picture-perfect slices, line the pan with parchment paper for easy lifting.
Make It Your Own – Add crushed pretzels for saltiness, mini marshmallows for gooey texture, or a sprinkle of espresso powder to deepen the chocolate flavor.
Chill Before Serving – Believe it or not, this cake tastes amazing cold. A night in the fridge enhances the peanut butter flavor.
How to Serve Reese’s Peanut Butter Earthquake Cake
There are two schools of thought when it comes to serving this masterpiece: warm and gooey, or chilled and firm. Both are amazing in their own way.
Warm: Serve straight from the pan with a scoop of vanilla ice cream. The contrast of hot cake and cold ice cream is pure magic.
Chilled: Refrigerate for a few hours and serve slices topped with whipped cream and crushed peanuts for a creamier, cheesecake-like texture.
Party Style: Cut into small squares and serve on a platter lined with parchment paper—perfect for gatherings.
Each serving feels indulgent, rich, and unforgettable. And if you really want to impress, drizzle melted chocolate or caramel on top before serving.
Serving Suggestions
The Reese’s Peanut Butter Earthquake Cake pairs beautifully with:
A cold glass of milk – classic and simple.
Coffee or espresso – the bitterness balances the sweetness.
Vanilla or peanut butter ice cream – for an over-the-top treat.
Fresh strawberries or bananas – to add a light, fruity contrast.
You can even serve it buffet-style at parties, letting guests add their own toppings: whipped cream, chopped nuts, or extra Reese’s pieces.
Time Guide
Prep Time: 15 minutes
Bake Time: 40–45 minutes
Cooling Time: 30 minutes
Total Time: ~1 hour 25 minutes
Servings: 12–15 generous slices
The Secret Charm of Reese’s Peanut Butter Earthquake Cake
The magic of this cake isn’t in precision—it’s in the chaos. Every time you make it, it bakes a little differently. Sometimes the peanut butter sinks deeper, sometimes the chocolate bubbles up more—but every version is delicious in its own unique way.
This dessert celebrates imperfection. It’s rustic, indulgent, and absolutely comforting. The cracked surface, the swirls of melted chocolate, the buttery aroma filling your kitchen—it’s the kind of experience that reminds you why baking is so satisfying.
No fancy decorating tools, no complex steps—just pure flavor and joy. And that’s why the Reese’s Peanut Butter Earthquake Cake has become a timeless favorite across kitchens everywhere.
Make-Ahead and Storage Tips
Storage: Keep leftovers in an airtight container in the refrigerator for up to 5 days.
Freezing: Wrap individual slices in plastic wrap and freeze for up to 2 months. Reheat in the microwave for 20–30 seconds before serving.
Reheating: A few seconds in the microwave brings back that gooey texture you love.
The flavors actually deepen over time, so the Reese’s Peanut Butter Earthquake Cake tastes even better on day two or three.
Final Thoughts
When you cut into the Reese’s Peanut Butter Earthquake Cake, you’ll see beautiful, uneven ribbons of peanut butter running through moist chocolate layers. The smell alone is intoxicating—a mix of cocoa, roasted peanuts, and buttery sweetness.
This isn’t a cake for perfectionists—it’s a cake for people who love comfort, chaos, and flavor. It’s a reminder that baking doesn’t have to be fancy to be unforgettable. Sometimes, all you need is a box of cake mix, a few pantry staples, and a craving for something truly indulgent.
So next time you need a dessert that looks homemade, tastes incredible, and disappears fast, make this Reese’s Peanut Butter Earthquake Cake. Let it crack, let it bubble, and let it wow everyone who takes a bite. Because in the world of desserts, a little bit of mess can create a whole lot of magic.